


How to setup MicroK8s with RBAC and Storage
Goal
Our objective is to install and configure MicroK8s with RBAC and Storage features enabled. RBAC is desired so that local development on MicroK8s more closely matches development on properly secured k8s clusters. Early versions of MicroK8s do not support Storage when RBAC is enabled. This issue was fixed in the v1.15.1 release.
In this post we’ll cover these steps:
- Install MicroK8s
- Configure Addons
- Setup Kubectl
- Create Admin User
- Create a Persistent Volume
- Access the Volume
- Cleanup
- Pausing MicroK8s
Install MicroK8s
MicroK8s is installed using snaps. Snap support must be enabled on your system before MicroK8s can be installed. Enabling snap support is beyond the scope of this post, please follow these instructions to enable snaps.
It’s also possible to run MicroK8s on MS-Windows using a virtual machine, here’s one general approach you can follow.
Determine which channel to install
Once snap support has been enabled on your system, check to see which versions of MicroK8s are available:
$ sudo snap info microk8s
name:      microk8s
contact:   https://github.com/ubuntu/microk8s
  box. Use it for offline development, prototyping, testing, or use it on a VM as a small, cheap,
  - microk8s.enable
  - microk8s.inspect
  - microk8s.istioctl
  - microk8s.kubectl
  - microk8s.linkerd
  - microk8s.reset
  - microk8s.start
  - microk8s.status
  - microk8s.stop
services:
  microk8s.daemon-apiserver:          simple, enabled, active
  microk8s.daemon-apiserver-kicker:   simple, enabled, active
  microk8s.daemon-containerd:         simple, enabled, active
  microk8s.daemon-controller-manager: simple, enabled, active
  microk8s.daemon-etcd:               simple, enabled, active
  microk8s.daemon-kubelet:            simple, enabled, active
  microk8s.daemon-proxy:              simple, enabled, active
  microk8s.daemon-scheduler:          simple, enabled, active
snap-id:      EaXqgt1lyCaxKaQCU349mlodBkDCXRcg
tracking:     edge
refresh-date: 3 days ago, at 13:40 EDT
channels:
  stable:         v1.15.0         2019-06-24 (671) 216MB classic
  candidate:      v1.15.1         2019-07-25 (720) 192MB classic
  beta:           v1.15.1         2019-07-25 (720) 192MB classic
  edge:           v1.15.1         2019-07-25 (720) 192MB classic
  1.16/stable:    –
  1.16/candidate: –
  1.16/beta:      –
  1.16/edge:      v1.16.0-alpha.1 2019-07-19 (714) 190MB classic
  1.15/stable:    v1.15.0         2019-06-24 (670) 216MB classic
  1.15/candidate: v1.15.1         2019-07-25 (719) 192MB classic
  1.15/beta:      v1.15.1         2019-07-25 (719) 192MB classic
  1.15/edge:      v1.15.1         2019-07-25 (719) 192MB classic
  1.14/stable:    v1.14.4         2019-07-18 (687) 217MB classic
  1.14/candidate: v1.14.4         2019-07-12 (687) 217MB classic
  1.14/beta:      v1.14.4         2019-07-12 (687) 217MB classic
  1.14/edge:      v1.14.4         2019-07-08 (687) 217MB classic
  1.13/stable:    v1.13.6         2019-06-06 (581) 237MB classic
  1.13/candidate: v1.13.6         2019-05-09 (581) 237MB classic
  1.13/beta:      v1.13.6         2019-05-09 (581) 237MB classic
  1.13/edge:      v1.13.7         2019-06-06 (625) 244MB classic
  1.12/stable:    v1.12.9         2019-06-06 (612) 259MB classic
  1.12/candidate: v1.12.9         2019-06-04 (612) 259MB classic
  1.12/beta:      v1.12.9         2019-06-04 (612) 259MB classic
  1.12/edge:      v1.12.9         2019-05-28 (612) 259MB classic
  1.11/stable:    v1.11.10        2019-05-10 (557) 258MB classic
  1.11/candidate: v1.11.10        2019-05-02 (557) 258MB classic
  1.11/beta:      v1.11.10        2019-05-02 (557) 258MB classic
  1.11/edge:      v1.11.10        2019-05-01 (557) 258MB classic
  1.10/stable:    v1.10.13        2019-04-22 (546) 222MB classic
  1.10/candidate: v1.10.13        2019-04-22 (546) 222MB classic
  1.10/beta:      v1.10.13        2019-04-22 (546) 222MB classic
  1.10/edge:      v1.10.13        2019-04-22 (546) 222MB classic
We want version v1.15.1 or later. This version is available on all three channels: candidate, beta and edge.
Install MicroK8s with the desired version
In this example we’ll choose the beta channel, while installing MicroK8s in classic mode:
$ sudo snap install --channel=beta --classic microk8s
Download snap "microk8s" (720) from channel "beta"
...
microk8s (beta) v1.15.1 from Canonical✓ installed
There’s more information about choosing the right channel in the official microk8s docs.
Configure MicroK8s addons
Check the status of MicroK8s to confirm which addons have been enabled. In this example, we’ll also wait for MicroK8s to be up and running:
$ microk8s.status --wait-ready
microk8s is running
addons:
rbac: disabled
knative: disabled
ingress: disabled
dns: disabled
metrics-server: disabled
linkerd: disabled
prometheus: disabled
istio: disabled
jaeger: disabled
fluentd: disabled
gpu: disabled
storage: disabled
dashboard: disabled
registry: disabled
Note that the microk8s.status command does not need to be run as root.
Enable RBAC addon
We want RBAC enabled so that we can gain experience configuring deployments with roles. Use the microk8s.enable command to turn on the RBAC addon.
$ sudo microk8s.enable rbac
Enabling RBAC
Reconfiguring apiserver
RBAC is enabled
Enable Storage addon
Similar to the RBAC addon, the storage addon should also be enabled
$ sudo microk8s.enable storage
Enabling default storage class
deployment.extensions/hostpath-provisioner created
storageclass.storage.k8s.io/microk8s-hostpath created
serviceaccount/microk8s-hostpath created
clusterrole.rbac.authorization.k8s.io/microk8s-hostpath created
clusterrolebinding.rbac.authorization.k8s.io/microk8s-hostpath created
Storage will be available soon
Enable other addons as desired
The following addons are not required, but can be helpful:
- dashboard - provides a web interface for managing microk8s, but be aware of security considerations
- registry - provides a docker or podman compatible registry for images
- dns - enables dns for service discovery
All of these addons can be enabled simultaneously
$ sudo microk8s.enable dns dashboard registry
Enabling DNS
Applying manifest
serviceaccount/coredns created
configmap/coredns created
deployment.apps/coredns created
service/kube-dns created
clusterrole.rbac.authorization.k8s.io/coredns created
clusterrolebinding.rbac.authorization.k8s.io/coredns created
Restarting kubelet
DNS is enabled
Applying manifest
secret/kubernetes-dashboard-certs created
serviceaccount/kubernetes-dashboard created
role.rbac.authorization.k8s.io/kubernetes-dashboard-minimal created
rolebinding.rbac.authorization.k8s.io/kubernetes-dashboard-minimal created
deployment.apps/kubernetes-dashboard created
service/kubernetes-dashboard created
service/monitoring-grafana created
service/monitoring-influxdb created
service/heapster created
deployment.extensions/monitoring-influxdb-grafana-v4 created
serviceaccount/heapster created
clusterrolebinding.rbac.authorization.k8s.io/heapster created
configmap/heapster-config created
configmap/eventer-config created
deployment.extensions/heapster-v1.5.2 created

If RBAC is not enabled access the dashboard using the default token retrieved with:

token=$(microk8s.kubectl -n kube-system get secret | grep default-token | cut -d " " -f1)
microk8s.kubectl -n kube-system describe secret $token

In an RBAC enabled setup (microk8s.enable RBAC) you need to create a user with restricted
permissions as shown in https://github.com/kubernetes/dashboard/wiki/Creating-sample-user

Enabling the private registry
Enabling default storage class
deployment.extensions/hostpath-provisioner unchanged
storageclass.storage.k8s.io/microk8s-hostpath unchanged
serviceaccount/microk8s-hostpath unchanged
clusterrole.rbac.authorization.k8s.io/microk8s-hostpath unchanged
clusterrolebinding.rbac.authorization.k8s.io/microk8s-hostpath unchanged
Storage will be available soon
Applying registry manifest
namespace/container-registry created
persistentvolumeclaim/registry-claim created
deployment.extensions/registry created
service/registry created
The registry is enabled
Setup the kubectl command
The kubectl command line interface program is used to configure and control your kubernetes cluster.
There are two ways to manage Microk8s using kubectl:
- use the microk8s.kubectl command or alias
- install a standalone kubectl program and configure it to work with MicroK8s
We’ll cover both methods, though I recommend the second method as it provides more flexibility
Using the microk8s.kubectl command or alias
You can use the microk8s.kubectl command instead of kubectl:
$ microk8s.kubectl get services -A
NAMESPACE            NAME                   TYPE        CLUSTER-IP       EXTERNAL-IP   PORT(S)                  AGE
container-registry   registry               NodePort    10.152.183.40    <none>        5000:32000/TCP           57m
default              kubernetes             ClusterIP   10.152.183.1     <none>        443/TCP                  82m
kube-system          heapster               ClusterIP   10.152.183.29    <none>        80/TCP                   57m
kube-system          kube-dns               ClusterIP   10.152.183.10    <none>        53/UDP,53/TCP,9153/TCP   57m
kube-system          kubernetes-dashboard   ClusterIP   10.152.183.236   <none>        443/TCP                  57m
kube-system          monitoring-grafana     ClusterIP   10.152.183.189   <none>        80/TCP                   57m
kube-system          monitoring-influxdb    ClusterIP   10.152.183.185   <none>        8083/TCP,8086/TCP        57m
It’s a long command to type, and is not compatible with other programs that attempt to execute the kubectl command directly, such as the VS Code kubernetes extension.
It’s possible to alias microk8s.kubectl to kubectl to resolve both of these issues, with this command:
$ sudo snap alias microk8s.kubectl kubectlAfter issuing this command, entering kubectl will actually execute microk8s.kubectl However I recommend that you install a standalone kubectl program instead of aliasing microk8s.kubectl.
Installing a standalone kubectl program
Rather than aliasing microk8s.kubectl, you can install a standalone kubectl program and configure it to work with your MicroK8s cluster.
Follow the installation instructions appropriate for your platform. You will need to place the kubectl program in a folder that is in your path.
For example if you’re running 64-bit linux, have a folder named $HOME/bin in your path and are running the bash shell, you could use this command to download kubectl directly into the bin folder on your path, then make it executable:
$ curl -L -o $HOME/bin/kubectl https://storage.googleapis.com/kubernetes-release/release/$(curl -s https://storage.googleapis.com/kubernetes-release/release/stable.txt)/bin/linux/amd64/kubectl
$ chmod +x $HOME/bin/kubectl
Configuring standalone kubectl context
The standalone kubectl program must be configured so that it knows which kubernetes cluster to access.
kubectl reads its configuration information from a config file that is typically stored in $HOME/.kub/config. Use the microk8s.config command to extract the context information that kubectl requires and save it in the config file.
Warning, this example will overwrite any config file that may already exist:
$ mkdir -p $HOME/.kube
$ microk8s.config view > $HOME/.kube/config
Now verify that the standalone kubectl command works correctly, ensure you can get a list of services:
$ kubectl get services -A
NAMESPACE            NAME                   TYPE        CLUSTER-IP       EXTERNAL-IP   PORT(S)                  AGE
container-registry   registry               NodePort    10.152.183.40    <none>        5000:32000/TCP           57m
default              kubernetes             ClusterIP   10.152.183.1     <none>        443/TCP                  82m
kube-system          heapster               ClusterIP   10.152.183.29    <none>        80/TCP                   57m
kube-system          kube-dns               ClusterIP   10.152.183.10    <none>        53/UDP,53/TCP,9153/TCP   57m
kube-system          kubernetes-dashboard   ClusterIP   10.152.183.236   <none>        443/TCP                  57m
kube-system          monitoring-grafana     ClusterIP   10.152.183.189   <none>        80/TCP                   57m
kube-system          monitoring-influxdb    ClusterIP   10.152.183.185   <none>        8083/TCP,8086/TCP        57m
If you need to access multiple kubernetes clusters, take a look at the kubectx program. It allows you to quickly switch between multiple kubernetes clusters.
Create an admin-user service account to access the dashboard (optional)
If you enabled the dashboard addon, you need to create a service account to access the dashboard:
$ kubectl create serviceaccount admin-user -n kube-system
serviceaccount/admin-user created
Then bind the new admin-user account to the cluster-admin role:
$ kubectl create clusterrolebinding admin-user --clusterrole cluster-admin --serviceaccount kube-system:admin-user
clusterrolebinding.rbac.authorization.k8s.io/admin-user created
Finally, extract the secret bearer token from the admin-user account, and save it in a safe place for future use.
$ kubectl -n kube-system describe secret $(kubectl -n kube-system get secret | grep admin-user | awk '{print $1}')
Name:         admin-user-token-r547b
Namespace:    kube-system
Labels:       <none>
Annotations:  kubernetes.io/service-account.name: admin-user
              kubernetes.io/service-account.uid: fa28e658-0f3b-4c69-af42-6ee35b00e148

Type:  kubernetes.io/service-account-token

Data
====
ca.crt:     1094 bytes
namespace:  11 bytes
token:      eyJhbGciOiJSUzI1NiIsImtpZCI6IiJ9.eyJpc3MiOiJrdWJlcm5ldGVzL3NlcnZpY2VhY2NvdW50Iiwia3ViZXJuZXRlcy5pby9zZXJ2aWNlYWNjb3VudC9uYW1lc3BhYN0tReallyMyTokenlbSIsImt1YmVybmV0ZXMuaW8vc2VydmljZWFjY291bnQvc2VjcmV0Lm5hbWUiOiJhZG1pbi11c2VyLXRva2VuLXI1NDdiIiwia3ViZXJuZXRlcy5pby9zZXJ2aWNlYWNjb3VudC9zZXJ2aWNlLWFjY291bnQubmFtZSI6ImFkbWluLXVzZXIiLCJrdWJlcm5ldGVzLmlvL3NlcnZpY2VhY2NvdW50L3NlcnZpY2UtYWNjb3VudsomeRandomTextTI4ZTY1OC0wZjNiLTRjNjktYWY0Mi02ZWUzNWIwMGUxNDgiLCJzdWIiOiJzeXN0ZW06c2VydmljZWFjY291bnQ6a3ViZS1zeXN0ZW06YWRtaW4tdXNlciJ9.Jss9zraaIn-nusPX52HH3mzaVY0dm_doJRM1M9OPjSo56EVK-OeGkYkt2GbYVU2DD7VeHCzuScqVTrf6kWV5MCSs1E1w5aS3XnRe-riW7k0wafwKNn2DbLczpSaSpwMGCIGqF1PLG4RIMzG9n_B0ftMUZb2rrUeYjvgLQPZo8Db0KOsGounri2fUrL1krHOKB8lBb2CyEJ141kR-fLyGVCvin5BcZeRcRfshKCbxWvoYxtDuGCIT3CLBAgFfawS1f4ytEqbPAuP6M0D2TKdZD7Dy01Tgz8Y1V2aTYw_obQgPieDGOgdnnsESH7f6XF7YtKMSXQuSwfFCS7nusXiTqA
The token text is the bearer token you’ll need to enter into the dashboard login interface.
Access the dashboard (optional)
If you enabled the dashboard addon, created an admin-user and extracted the bearer token, you can now login to the kubernetes dashboard.
Determine the IP address for the dashboard service
To access the kubernetes dashboard, you must determine the IP address assigned to the dashboard service. Use the kubectl command to do this:
$ kubectl get services -n kube-system
NAME                   TYPE        CLUSTER-IP       EXTERNAL-IP   PORT(S)                  AGE
heapster               ClusterIP   10.152.183.29    <none>        80/TCP                   68m
kube-dns               ClusterIP   10.152.183.10    <none>        53/UDP,53/TCP,9153/TCP   68m
kubernetes-dashboard   ClusterIP   10.152.183.236   <none>        443/TCP                  68m
monitoring-grafana     ClusterIP   10.152.183.189   <none>        80/TCP                   68m
monitoring-influxdb    ClusterIP   10.152.183.185   <none>        8083/TCP,8086/TCP        68m
Here the service kubernetes-dashboard has been assigned cluster-ip 10.152.183.236
Open a web browser to https://10.152.183.236 to reach the login screen
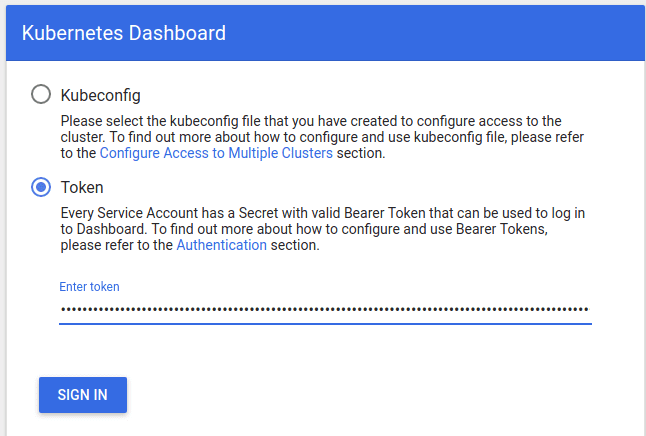
Choose Token mode and paste the previously retrieved bearer token into the Enter token text box.
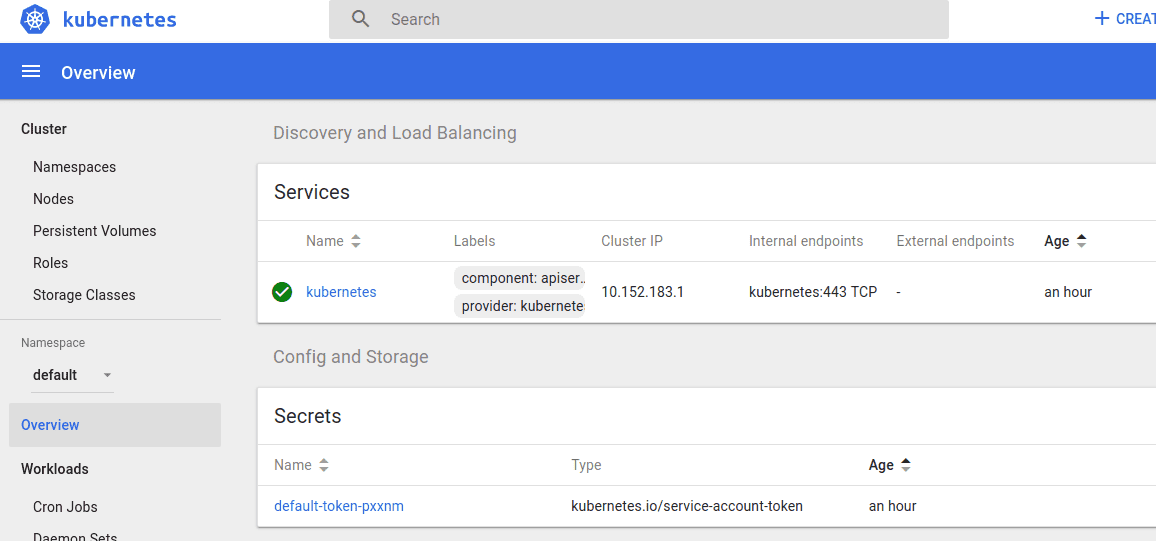
After clicking Sign In you should see the following overview screen:
Create a Persistent Volume
We’re going to create a persistent volume using the StorageClass and PersistentVolumeClaim mechanism, rather than directly creating a Persistent Volume. This is the recommended method for obtaining storage in the most general way when distributing k8s applications.
We’ll first create a new StorageClass, and then create a Persistent Volume Claim that uses the new Storage class.
Create a StorageClass
Storage Classes allow a k8s administrator to categorize storage resources, e.g. “fast” vs “slow”. Storage classes specify a provisioner to use when instantiating volumes. MicroK8s activates the microk8s.io/hostpath storage provisioner when the Storage addon has been enabled.
The following demo-storageclass.yml file will create a storage class with name demo, using the microk8s.io/hostpath storage provisioner.
---
apiVersion: storage.k8s.io/v1
kind: StorageClass
metadata:
  name: demo
provisioner: microk8s.io/hostpath
reclaimPolicy: Delete
volumeBindingMode: Immediate
---
Load the storage class yaml file into MicroK8s using the kubectl apply command:
$ kubectl apply -f demo-storageclass.yml
storageclass.storage.k8s.io/demo created
Create a Persistent Volume Claim
Pods obtain access to storage via Volumes, which in-turn can be dynamically created using Persistent Volume Claims.
This demo-persistent-volume-claim.yml file creates a persistent volume claim named demo-volume-claim. This claim will request 500 megabytes of storage space from the StorageClass named demo that we created in the previous step.
---
apiVersion: v1
kind: PersistentVolumeClaim
metadata:
  name:  demo-volume-claim
spec:
  accessModes:
    - ReadWriteOnce
  storageClassName: demo
  resources:
    requests:
      storage: 500M
---
Load the persistent volume claim into MicroK8s using the kubectl apply command:
$ kubectl apply -f demo-persistent-volume-claim.yml
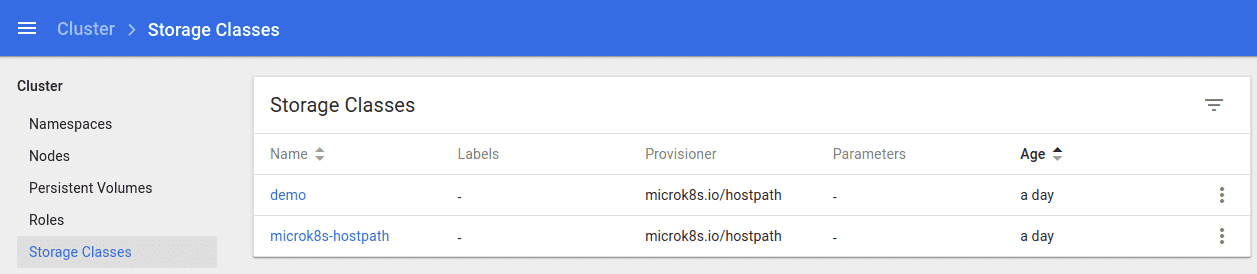
persistentvolumeclaim/demo-volume-claim createdIf you enabled the kubernetes dashboard you will see the storage class demo listed:
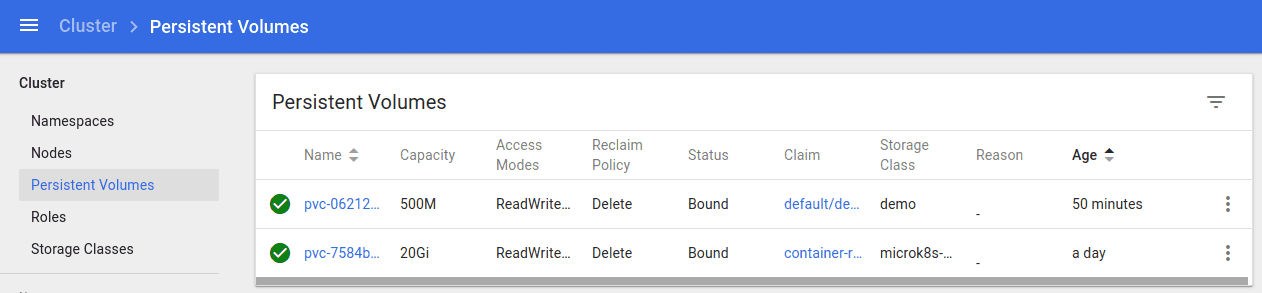
And, the persistent volume demo as well.
Access the Persistent Volume
Now that the persistent volume claim has been created, we can create a pod that uses the claim when mounting a volume.
Create a pod
This demo-pod.yml file creates a pod that runs the sleep command. The persistent-volume-claim demo-volume-claim provides a volume that is mounted at /tmp/test
---
apiVersion: v1
kind: Pod
metadata:
  labels:
    run: demo
  name: demo
spec:
  volumes:
    - name: demo-storage
      persistentVolumeClaim:
        claimName: demo-volume-claim
  containers:
  - args:
    - sleep
    - "3600"
    image: busybox
    name: demo
    volumeMounts:
      - mountPath: "/tmp/test"
        name: demo-storage
  dnsPolicy: ClusterFirst
  restartPolicy: Never
Load the persistent volume claim into MicroK8s using the kubectl apply command:
$ kubectl apply -f demo-pod.yml
pod/demo created
Verify the volume was mounted into the pod
We can use the kubectl exec command to verify that the pod has access to the demo-volume-claim. Here we’ll execute the df command in the demo pod:
$ kubectl exec demo -it -- df -h
Filesystem                Size      Used Available Use% Mounted on
overlay                   7.7G      3.3G      4.0G  45% /
tmpfs                    64.0M         0     64.0M   0% /dev
tmpfs                     7.8G         0      7.8G   0% /sys/fs/cgroup
/dev/mapper/Fire2-var
                          7.7G      3.3G      4.0G  45% /tmp/test
/dev/mapper/Fire2-var
                          7.7G      3.3G      4.0G  45% /etc/hosts
/dev/mapper/Fire2-var
                          7.7G      3.3G      4.0G  45% /dev/termination-log
/dev/mapper/Fire2-var
                          7.7G      3.3G      4.0G  45% /etc/hostname
/dev/mapper/Fire2-var
                          7.7G      3.3G      4.0G  45% /etc/resolv.conf
shm                      64.0M         0     64.0M   0% /dev/shm
tmpfs                     7.8G     12.0K      7.8G   0% /var/run/secrets/kubernetes.io/serviceaccount
tmpfs                     7.8G         0      7.8G   0% /proc/acpi
tmpfs                    64.0M         0     64.0M   0% /proc/kcore
tmpfs                    64.0M         0     64.0M   0% /proc/keys
tmpfs                    64.0M         0     64.0M   0% /proc/timer_list
tmpfs                    64.0M         0     64.0M   0% /proc/timer_stats
tmpfs                    64.0M         0     64.0M   0% /proc/sched_debug
tmpfs                     7.8G         0      7.8G   0% /proc/scsi
tmpfs                     7.8G         0      7.8G   0% /sys/firmware
You can see that the mount point /tmp/test exists, but interestingly its 3.3 GB, not 500 MB. This happens because the PersistentVolumeClaim specifies the minimum desired volume size. The microk8s.io/hostpath provisioner simply mounts the demo volume in it’s own working folder, which happens to be /var on this system. Therefore the free space shown is that of the /var partition.
Cleanup
We can now remove the demo pod and persistent volume claim:
$ kubectl delete -f demo-pod.yml -f demo-persistent-volume-claim.yml
pod "demo" deleted
persistentvolumeclaim "demo-volume-claim" deleted
Uh-oh, MicroK8s persistent volumes don’t get cleaned up!
Even in v1.15.1 there appears to be a bug in the microk8s.io/hostpath provisioner in that it does not delete persistent volumes.
The kubectl get persistentvolumes command is used to list all persistent volumes:
$ kubectl get persistentvolumes
NAME                                       CAPACITY   ACCESS MODES   RECLAIM POLICY   STATUS        CLAIM                               STORAGECLASS        REASON   AGE
pvc-0621280e-d5dc-4640-b232-38021643fb65   500M       RWO            Delete           Terminating   default/demo-volume-claim           demo                         73m
pvc-071bc289-af01-4102-880a-82d1fa75094d   500M       RWO            Delete           Released      default/demo-volume-claim           demo                         16m
pvc-7584be42-3f93-4ea2-a8b8-b6ef4306754f   20Gi       RWX            Delete           Bound         container-registry/registry-claim   microk8s-hostpath            30h
Here you can see two instances of default/demo-volume-claim, one for each of the tests I carried out while writing this post. These persistent volumes should have been automatically deleted by the microk8s.io/hostpath provisioner.
Troubleshooting microk8s.io/hostpath provisioner
Let’s spend a moment troubleshooting this. The microk8s.io/hostpath provisioner runs as a pod under the kube-system namespace. We can find the assigned pod name with the kubectl get pods command:
$ kubectl get pods -n kube-system
NAME                                              READY   STATUS    RESTARTS   AGE
coredns-86c94466cc-szlch                          1/1     Running   0          30h
heapster-v1.5.2-6b794f77c8-9gnhc                  4/4     Running   0          30h
hostpath-provisioner-65cfd8595b-nn6bm             1/1     Running   0          30h
kubernetes-dashboard-7d75c474bb-hcmkk             1/1     Running   0          30h
monitoring-influxdb-grafana-v4-6b6954958c-7g5bm   2/2     Running   0          30h
We want to view recent log messages for pod hostpath-provisioner-65cfd8595b-nn6bm using the kubectl logs command, lets look at the last 5 lines:
$ kubectl logs hostpath-provisioner-65cfd8595b-nn6bm -n kube-system --tail=5
I0730 03:13:43.615953       1 hostpath-provisioner.go:133] removing backing directory: %v/var/snap/microk8s/common/default-storage/default-demo-volume-claim-pvc-071bc289-af01-4102-880a-82d1fa75094d
I0730 03:13:43.616042       1 controller.go:869] volume "pvc-0621280e-d5dc-4640-b232-38021643fb65" deleted
I0730 03:13:43.616048       1 controller.go:869] volume "pvc-071bc289-af01-4102-880a-82d1fa75094d" deleted
I0730 03:13:43.617107       1 controller.go:876] failed to delete volume "pvc-0621280e-d5dc-4640-b232-38021643fb65" from database: persistentvolumes "pvc-0621280e-d5dc-4640-b232-38021643fb65" is forbidden: User "system:serviceaccount:kube-system:microk8s-hostpath" cannot delete resource "persistentvolumes" in API group "" at the cluster scope
I0730 03:13:43.617161       1 controller.go:876] failed to delete volume "pvc-071bc289-af01-4102-880a-82d1fa75094d" from database: persistentvolumes "pvc-071bc289-af01-4102-880a-82d1fa75094d" is forbidden: User "system:serviceaccount:kube-system:microk8s-hostpath" cannot delete resource "persistentvolumes" in API group "" at the cluster scope
It looks like some kind of permission problem. For reference, here’s the original issue whose fix for Storage and RBAC landed in MicroK8s release v1.15.1 https://github.com/ubuntu/microk8s/issues/516
Looking at the ClusterRole specified in the corresponding changeset it looks like the delete verb is not listed for persistentvolumes resources. I wonder if adding the delete verb to the ClusterRole will fix the problem.
Patching the microk8s-hostpath ClusterRole
I don’t see a way to ‘patch’ existing ClusterRole settings. However like most artifacts in k8s, I can get the current settings, output them to a file, edit the file and re-apply the file.
First we’ll get the current clusterrole settings and write them to stdout and to /tmp/hostpath-clusterrole.yml:
$ kubectl get clusterrole microk8s-hostpath -o yaml | tee /tmp/hostpath-clusterrole.yml
apiVersion: rbac.authorization.k8s.io/v1
kind: ClusterRole
metadata:
  annotations:
    kubectl.kubernetes.io/last-applied-configuration: |
      {"apiVersion":"rbac.authorization.k8s.io/v1","kind":"ClusterRole","metadata":{"annotations":{},"name":"microk8s-hostpath"},"rules":[{"apiGroups":[""],"resources":["persistentvolumeclaims"],"verbs":["list","get","watch","update"]},{"apiGroups":[""],"resources":["persistentvolumes"],"verbs":["list","get","update","watch","create"]},{"apiGroups":[""],"resources":["events"],"verbs":["create","patch"]},{"apiGroups":["storage.k8s.io"],"resources":["storageclasses"],"verbs":["list","watch"]}]}
  creationTimestamp: "2019-07-28T20:31:35Z"
  name: microk8s-hostpath
  resourceVersion: "1492"
  selfLink: /apis/rbac.authorization.k8s.io/v1/clusterroles/microk8s-hostpath
  uid: efe1a790-d023-4552-8aaa-cb7eecd05a0d
rules:
- apiGroups:
  - ""
  resources:
  - persistentvolumeclaims
  verbs:
  - list
  - get
  - watch
  - update
- apiGroups:
  - ""
  resources:
  - persistentvolumes
  verbs:
  - list
  - get
  - update
  - watch
  - create
- apiGroups:
  - ""
  resources:
  - events
  verbs:
  - create
  - patch
- apiGroups:
  - storage.k8s.io
  resources:
  - storageclasses
  verbs:
  - list
  - watch
Let’s edit the file /tmp/hostpath-clusterrole.yml, remove the annotations and add the delete verb under the persistentvolumes resource. The updated file looks like this:
apiVersion: rbac.authorization.k8s.io/v1
kind: ClusterRole
metadata:
  name: microk8s-hostpath
rules:
- apiGroups:
  - ""
  resources:
  - persistentvolumeclaims
  verbs:
  - list
  - get
  - watch
  - update
- apiGroups:
  - ""
  resources:
  - persistentvolumes
  verbs:
  - list
  - get
  - update
  - watch
  - create
  - delete
- apiGroups:
  - ""
  resources:
  - events
  verbs:
  - create
  - patch
- apiGroups:
  - storage.k8s.io
  resources:
  - storageclasses
  verbs:
  - list
  - watch
Then, apply the modified ClusterRole file:
$ kubectl apply -f /tmp/hostpath-clusterrole.yml
clusterrole.rbac.authorization.k8s.io/microk8s-hostpath configured
Finally, check the hostpath provisioner logs again:
$ kubectl logs hostpath-provisioner-65cfd8595b-nn6bm -n kube-system --tail=5
I0730 03:32:13.624464       1 controller.go:893] scheduleOperation[delete-pvc-0621280e-d5dc-4640-b232-38021643fb65[33cb6f70-27a8-46f3-93a9-dd1f70f1a186]]
I0730 03:32:13.626559       1 hostpath-provisioner.go:133] removing backing directory: %v/var/snap/microk8s/common/default-storage/default-demo-volume-claim-pvc-0621280e-d5dc-4640-b232-38021643fb65
I0730 03:32:13.626587       1 controller.go:869] volume "pvc-0621280e-d5dc-4640-b232-38021643fb65" deleted
I0730 03:32:13.628208       1 controller.go:880] volume "pvc-0621280e-d5dc-4640-b232-38021643fb65" deleted from database
That certainly seems to have helped. Let’s share the news with the MicroK8s project via pull request
Update: The pull request was accepted and will be released with v1.15.2
Resetting MicroK8s
You can remove all pods and settings from MicroK8s using the microk8s.reset command. This may be useful if you want to undo all the changes you’ve made to your MicroK8s instance.
microk8s.reset is a destructive command, it will:
- kill all pods
- delete all images from the microk8s registry
- delete all persistent volumes
- delete all user accounts
Based on the discussion in this issue, to properly clean up persistent volumes, you must first disable the storage addon before issuing the microk8s.reset command because you will be asked to confirm persistent volume deletion:
$ sudo microk8s.disable storage
Disabling default storage
deployment.extensions "hostpath-provisioner" deleted
storageclass.storage.k8s.io "microk8s-hostpath" deleted
serviceaccount "microk8s-hostpath" deleted
clusterrole.rbac.authorization.k8s.io "microk8s-hostpath" deleted
clusterrolebinding.rbac.authorization.k8s.io "microk8s-hostpath" deleted
Storage removed
Remove PVC storage at /var/snap/microk8s/common/default-storage ? (Y/N): y
Storage space reclaimed
When the Storage addon is disabled, the registry addon is also automatically disabled.
After disabling the Storage addon, you can then issue the microk8s.reset command:
sudo microk8s.reset
Calling clean_cluster
Cleaning resources in namespace container-registry
endpoints "registry" deleted
event "registry-6c99589dc-8xsnq.15b5acb22721341e" deleted
persistentvolumeclaim "registry-claim" deleted
pod "registry-6c99589dc-8xsnq" deleted
secret "default-token-8bd24" deleted
serviceaccount "default" deleted
service "registry" deleted
deployment.apps "registry" deleted
... lots of output
role.rbac.authorization.k8s.io "system:controller:bootstrap-signer" deleted
role.rbac.authorization.k8s.io "system:controller:cloud-provider" deleted
role.rbac.authorization.k8s.io "system:controller:token-cleaner" deleted
namespace "container-registry" deleted
namespace "kube-node-lease" deleted
Removing CRDs
No resources found
Waiting for kubernetes resources to be released
Cleaning up addons client binaries..
Pausing MicroK8s
It’s possible to temporarily stop all MicroK8s processes with the stop command:
$ sudo microk8s.stopThis is handy if you need to save on laptop battery power or free up RAM for other processes. MicroK8s can then be resumed with the start command:
$ sudo microk8s.startSummary
In this post we setup MicroK8s with RBAC and storage. We created a StorageClass and PersistentVolumeClaim, and created a pod to use that volume. We also found a bug in MicroK8s, did a little troubleshooting and proposed a fix.
Was this useful to you? Please share your thoughts.